Saturday, June 11, 2011

Home sweet Home

Source: flickr.com via Angela on Pinterest


Source: flickr.com via Angela on Pinterest


Source: etsy.com via Angela on Pinterest


Source: etsy.com via Angela on Pinterest


Sure do love these sweet home things I found on PINTEREST! Last year I bought some embroidery hoops, floss and funky embroidery patterns yet never tried them out. Do you ever do that? Get inspired to do a new craft but never quite get it going? I did some embroidery when I was in my 20s and really loved it but I guess I got too busy to keep it up. Maybe this summer I will revive it. Or maybe Fall. Or at least winter...Oh I am such a procrastinator!

Wednesday, June 8, 2011

Summer Scents I love

honeysuckle, gala apple and stephanotis
purple passion fruit, Shangri-la yellow peony and vanilla orchid

Stella by Stella McCartney
soft rose and amber
I don't know about you, but I have an aversion to strong pungent perfumes that so many ladies seem to engulf themselves in. Standing in line with a super drenched in scent lady makes me wish I had used the drive through! Then there are the times when someone walks by and you get an ever so gentle waft of something light and refreshing. That's where I want to be. Gone are the days of Jean Nate cologne as the go to gift for an office Christmas gift exchange. No more Poison or Shalimar attacking our senses in the elevator. Those days are gone my friend. Embrace the clean fresh fragrances that just make you feel like you smell clean and happy!

I actually prefer body mists for their light and refreshing smells, like Victorious Secret, Secret Charm and Bombshell. There are many varieties at VS so you can choose floral or fruity scents. Bombshell also comes in a Summer edition which has a citrus edge to it but I prefer the floral regular Bombshell.
Stella is a long time favorite of mine with a modern soft rose scent, not at all like your granny's rose perfume. There is also a Stella Nude scent which is also so lovely and light!
Hope you have a fresh and cool summer!

Tuesday, June 7, 2011

hair-rific braids

via Crystal on Pinterest


I am trying to grow my hair longer so I can do a braid "do"! Well, actually for many reasons, braids being one of them. I haven't had longer hair for a while and want to have it before I am too old for it :)

Sunday, June 5, 2011

more my style


Let's be honest. A few posts ago I featured a make it yourself canopy for a backyard. I will probably never attempt such a task even though it was described as easy. These pictures are much more a reflection of what I would do. Some rope, some old blankets and some trees or branches. More colorful, fun looking and easier. I especially get a kick out of the crochet tent. Now that would be a statement piece at the old State Park campground! Just pray it doesn't rain!

Saturday, June 4, 2011

Rise and Swine!


Last night I watched "The Shark Tank" for the first time and became an instant fan. Successful business people have money to invest while inventors and creators of various ideas and gadgets make their pitch asking for money to help them start up their businesses. One woman had an idea of starting a club like Netflix, only for kids toys, where you pay a monthly fee for used but sterilized and shrink wrapped toys which are delivered to your home for your kids to play with, then send back when bored. Each month you get a new batch.
But by far the most unique pitch was for an alarm clock that starts cooking bacon ten minutes before you get up, so the smell wakens you AND you get to eat the bacon when it is done. Needless to say the investors were amused by it, but passed on it due to safety hazards like setting your bed on fire while you are sleeping!

Friday, June 3, 2011

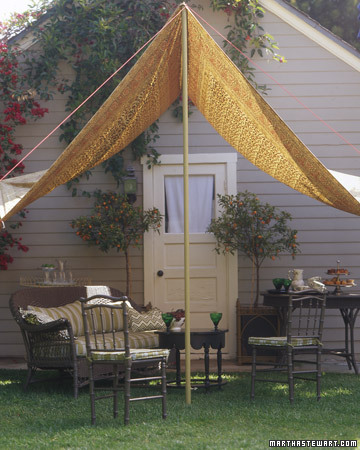
make your own shade on a sunny day

Create a cool spot for summer living with one of our easy canopies.

All by itself, a simple canopy can turn an empty space outside into a "place." While trees might take years to grow, an expanse of cloth goes up in minutes, providing shade wherever you need it most. When the outdoor season ends -- or a storm whips in unexpectedly -- you can take it down, quick as a wink.

Unlike a pricey pergola or arbor, which demands a permanent surrender of ground, a canopy requires scant commitment or expense. For the most basic version, spend a few dollars on a drop cloth from a hardware store, and a few more on the supplies you will need to suspend it overhead: a grommet kit, tent poles, stout cord, and sturdy pegs. These ideas can be modified for other settings and styles.

You can sew a canopy yourself, or have one stitched by a seamstress or sailmaker. You'll need a few things from a hardware store, garden center, or camping-supply store to put up the fabric you choose. The way you erect the canopy depends on where you want it to be -- it can be suspended from poles, or stretched between a wall or roofline and poles.

Tools and Materials
- A grommet tool makes it easy to punch sturdy holes in the corners of your fabric.

- Plastic tent pegs anchor lines from the tops of poles into the lawn or planting beds.

- An inexpensive canvas drop cloth can serve as a fine canopy.

- Stout clothesline or venetian-blind cord will keep a canopy in place.

- Wooden pole with dowel pin or bamboo pole with dowel

- Adjustable aluminum tent poles can be raised or lowered to fit your setting.

Attached to a Wall or Fence How-To
At a corner of the canopy near the house, a short length of cord extends from the grommet to a screw eye on the house. At its apex, the tent is anchored to the center pole; two cords tied to the top of the pole are pegged to the lawn. There is also a cord anchoring each of the shorter poles that support the sides.

To fashion a patterned tent, sew together two full-size lightweight cotton bedspreads, creating a reinforced 2-inch overlap in the center. Punch grommet holes in the corners, and one on each end of the center overlap. Cut a third bedspread to make full-length, 6-inch-wide border strips. Stitch one to either side of the fabric, which adds hanging borders. To put up the peaked canopy, use a tall pole for the center and shorter poles for either side; attach screw eyes in corresponding spots on the house.


Free-Standing Canopy How-To
If you don't want to secure the canopy to a wall or fence, create a free-standing one with four poles. You'll need four people, too. Start by installing a metal grommet at each corner of your canopy fabric. Stand four poles with long, thin tips (use tent poles; drill a wood pole so it holds a dowel pin or fit bamboo, which is hollow, with a dowel) on the ground. Hook the grommets over the tips. Then have each person simultaneously loop sturdy cord around the tip of his or her pole and stake the other end of the cord into the ground several yards away.


- Grommets at the corners of the fabric fit over poles in front and are tied to screw eyes on the house

- Loop cord around the poles to keep the fabric in place and attached to pegs in the lawn for added stability

- Tie extra fabric to the cords to make them more visible so no one will trip over them

- Canopy poles get added stability by fitting them into lengths of PVC pipe and sinking the pipe into soil-filled terra-cotta pots

- Painted wooden dowels and colored cord make the canopy's mechanics part of the picture

- Take the tent down when not in use to discourage fading

Tips

- Cut openings that allow wind to circulate through

- Grommets at the corners of the fabric fit over poles in front and are tied to screw eyes on the house

- Loop cord around the poles to keep the fabric in place and attached to pegs in the lawn for added stability

- Tie extra fabric to the cords to make them more visible so no one will trip over them

- Canopy poles get added stability by fitting them into lengths of PVC pipe and sinking the pipe into soil-filled terra-cotta pots

- Painted wooden dowels and colored cord make the canopy's mechanics part of the picture

- Take the tent down when not in use to discourage fading

Wednesday, June 1, 2011

Summer Survival Iced Coffee


Cold-Brewed Iced Coffee

With thanks to the New York Times and a bunch of web sites.

2/3 cup ground coffee
3 cups cold water, plus more for finishing
Ice cubes
Whatever you take in your coffee

Place the ground coffee in a pitcher or bowl. Cover with 3 cups water. Let stand at room temperature for 12 hours or overnight.
Using a fine-mesh sieve, strain the coffee into a small bottle or pitcher. (Here is where I split with the other sources. Some suggest a double-straining method, using a sieve and then a coffee filter or cheesecloth to get the last bits of ground coffee. A single straining works fine for me, because any ground coffee left in the mix will settle to the bottom and can be avoided. Up to you.)
Refrigerate the mix until you need it. To use it, pour equal amounts coffee and water over ice. (Use less water if you like, but remember that the coffee mixture is very strong.) If you really want to get fancy, you could also make a batch of ice cubes out of it, but that's more trouble than I can handle in summer.
Add whatever you need (while I usually drink coffee black, I do like a little skim milk in iced coffee).
Drink. Feel cooler.